Showing posts with label Tutorial. Show all posts

Sunday, October 2, 2016

Google Expeditions - The WOW Factor!


Yesterday, I was lucky enough to attend EdCampSD in Escondido and learn from Jen Roberts as she shared Google Expeditions. I had read about Expeditions, which was released shortly after my Google GEO Teacher Institute in June 2015, but hadn't tried it myself.


- I had actually participated in a web meeting with an Expeditions team member this past spring with two of my kids. He interviewed them about what they were interested in exploring in Antarctica. It was pretty cool to have a connection to Expeditions and I've been really excited to get started.

So Jen pulled out a few Google Cardboard boxes and had us all download the Expeditions app to our phones or ipads. Out of about 30+ people in the room, we had about 8 viewers so most of us just used our devices without the viewer.

First take away - We don't need to use cardbooard or a VR viewer to do an Expedition! It works just fine full screen on our phones or tablets. The device just needs to have a gyro.

Next, she had me set up as a leader on my ipad. It's as simple as clicking LEAD on the app. I searched for an Expedition - chose an Underwater Excursion, downloaded it - and off we went. Others in the room opened the app, found my name and clicked JOIN.

Teacher View - Starting Expedition
Student View - JOIN Teacher's Expedition


Seeing the teacher and student view at the same time was exactly what I needed to understand how this works and be ready to share with my class and my team mates. I can't wait! We are going on some Expeditions! Next stop - Mt. Everest! or Yosemite! or the Googleplex! or Stanford! or Antarctica! So many choices!!

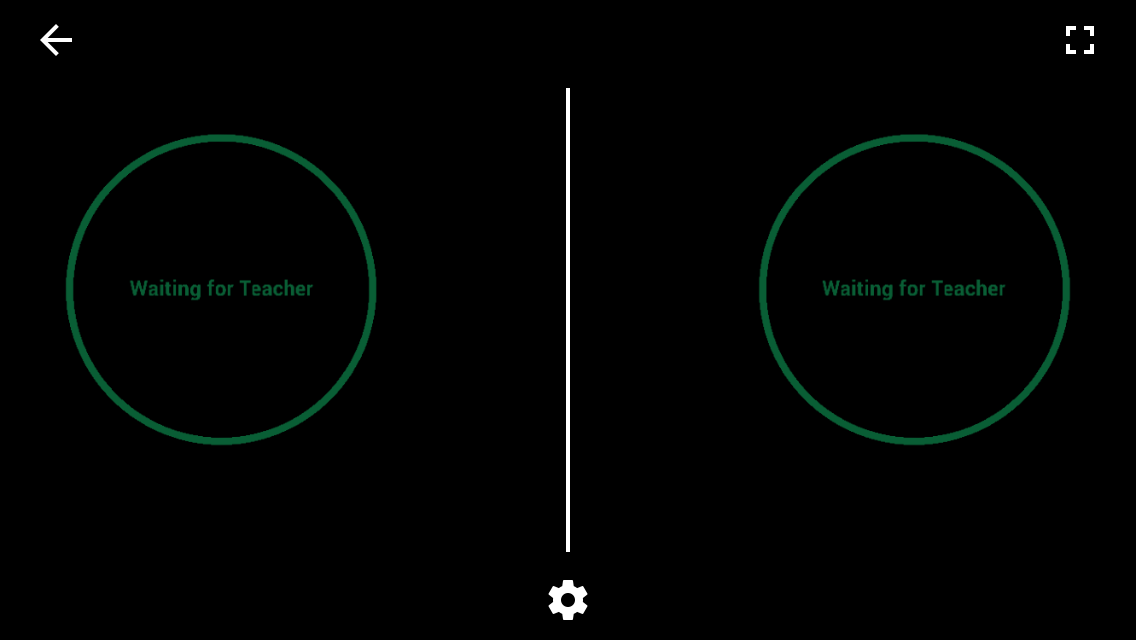
Student View - Waiting for Teacher to Press Play

Student View - Toggle Between VR Viewer and Full Screen


Student View - Full Screen

Teacher View - Swipe cards to the left for next scenes

Teacher View - Select Feature to View. Happy faces show where students are looking


Student View - Arrow shows where the teacher wants you to look


Student View - Target Feature

Student View - Cardboard Mode
While it would be pretty fun to have a class full of VR viewers, knowing that this is possible without is exciting! I have 7 ipads in our class and can probably borrow others from colleagues. We could set up a list of those on our site willing to share and schedule Expeditions to some of these amazing places!
Thank you, Jen, for sharing this amazing resource!

Wednesday, August 10, 2016

Collaboration: Sharing Google Forms


Teachers are so amazing about sharing! It goes under the category of "why recreate the wheel?" most of the time. I share with you, you share with me, our lives just got easier and both teachers and students win!

This is why having a wonderful PLN that includes teachers on Twitter that I've never met has been so amazing! Recently, I was reading a blog post from Ms. Drasby (Google Forms Supports Spelling Mastery) where she shared a copy of her Google Form. I had tried to find a way to do that for over a year with no luck. 


I replied and asked about it and she wrote up the procedure in a blog post: Google Forms Force a Copy. It's super easy and simple but if you don't know the trick, it won't work like it didn't for me for so long! It's definitely worth the few minutes to check out her blog and learn the trick!
Google Forms Force a Copy

Now, I am so excited about being able to make forms as a grade level team and share the workload. We can share forms resources just like we do with Hyperdocs, Graphic Organizers, and everything else we do as teachers.

Here are a few of my favorites to get you started: When you click on the form link it will force you to "Make a Copy" of the form I created. So you will have your own, not shared with anyone, and your data will be yours alone. Since it's your copy, you can change it however you would like to make it work for you.

Parent Info Form (Click this link for the Form):
I post this on my website at the beginning of the year and usually get most of the info before school even starts on Monday morning. 

Parent Information 2016.png


Favorite Genre of Books (Click this link for the Form):


<<This one is a good beginning of the year inventory of your students' reading interests.


Here is a spreadsheet of forms my 3rd grade students created to practice multiplication facts. When you click the link, it will copy the form into your drive. There is the tutorial to use Flubaroo to make them autograde. OR, you can turn them into Google Form Quizzes. You will just have to change the answers to multiple choice answers to use Google Forms quizzes at this time.

Multiplication Practice Forms (Click this link)


And here are several other Google Forms to share. 
Click to copy forms and make them your own. Follow the directions above from Ms. Drasby and share your forms too!
Google Forms (Click this link)

Sunday, December 20, 2015

Creating Digital Word Sorts


Some tips to creating a word sort using google slides:

Decide on your category headers and lay them out at the top. Set up your background. Once you’ve got it the way you want it, download as an image - I usually use png, but jpg would work too. Then go to ‘change background’ and add that image as a background.
This makes it so a student can’t accidentally change the headers or categories.


Make the word cards by using shapes and typing inside the shape. If you want them to be in a neat stack, select them all (you can select everything by holding the left mouse button and dragging over everything you want selected). Go to Arrange, then arrange vertically, then arrange horizontally. They will be in one neat stack that you can place wherever you want.


You could also make the word cards so those can’t be altered by creating them like you did the background and downloading them as an image, and then uploading them to the slides file. It depends on how important this is to your class and how much time you want to put into it.

Here is an example of a completed word sort that we used last week. The link will prompt you to make a copy.
Word Sort - Adding -ed and -ing

Image of word sort linked above


Wednesday, August 6, 2014

Class Dojo Continued :)

Here's a little more about Class Dojo. In Dojo, you can set up your class with all of your students and it will assign a random monster avatar. You or students can change the avatar. You can change them under "Edit Class" and students can change them when they create their own account. To create a student account, go to "Reports", click "Student Accounts", print and send home the Student Codes. While there, you can click on "Parent Accounts", print and send home Parent Codes. Parent accounts let parents check the status of their student and you can message them individually or as a group.
One thing I decided to try this upcoming year, is to set up Team Points. I added my five table groups and gave them unique avatars. Changing avatars is done under "Edit Class". You can choose a new monster or upload your own images to use. See below.


Then you can also create your own behaviors based on your class. I've added behaviors that work for us and added character traits. Part of our day will be recognizing peers for showing positive character traits. Those nominations and my own observations will be noted here with the character traits also.  You can organize the behaviors in the order that makes it easy for you by numbering them.


Using Class Dojo, it is easy to watch for trends in behaviors. Are there certain times during the day or subjects that are difficult for a student? Am I making sure I'm noticing positive behaviors from every student? Is there anyone who is quietly slipping through the cracks? I'll make a special attempt to spend more time making a connection and noticing positive behaviors.
At the end of each week, we'll note the total points to pay out in the class money and reset the points for the following week. The reset just clears the points from the screen but the student's history of points will still be there.
Class Dojo can be accessed by all devices. I use my laptop when I want to display it on the projector. I have student leaders note good listening behavior on the ipad while I do a read aloud, students also use the ipad to give themselves points for good work. I can also use my phone to give points while leading reading group, or at library, or wherever. This is an amazing, powerful, free app! Give it a try!


Monday, June 24, 2013

Google Drive - Sharing Files and Folders

One of the most amazing things about Google Drive is the ability to share files and folders. Not only can you share them, but if you are using Google file types (Document, Presentation, Spreadsheet, Drawing, etc) you and up to 50 others can work on the file simultaneously on separate computers no matter where each person is located.


When you are ready to share a file (or a folder, it works the same way), right click on the row of the file or folder, go down to share and choose share from the sharing options.


Check the permissions for sharing. For school files and folders I keep them as "Private - only the people listed below can access". 


At the bottom where it says "Add People" add the email addresses of people you want to have access. If they are district staff or students, once you begin typing their name, the email address will show up for you to choose.


There is a checkbox if you want to email the person/people that you are sharing with. I have students uncheck this box so I don't get 100's of emails. Then just click "Share & Save". 

The shared documents will show up in the other person's Shared Folder. You have the choice in how others interact with the file or folder. They can be set to View Only, Edit, or Comment Only. 
One note - when you share a folder, any document placed or created in that folder will also be shared the same way.

Check it out and try it. It's awesome!

Google Drive

One of the great things about Google Drive is the ability to automatically save everything you do. For students, this gives them the ability to save their work in progress wherever they are and continue later even if it's at a different computer or at home.

For teachers you can organize your files, access them wherever you are, share and collaborate with colleagues, and also share or assign files with students.

The first thing you do is log in to your Google Drive. For SEES teachers, you will go to the district cloud at https://cloud.smusd.org/, then type in your district log in. You'll find your Google Docs on the Desktop (if you don't see it, click desktop at the top of the page in the black bar.) If you are also signed into a personal Google account, you may need to click "sign in as another user" to get to your district account.

Within Google Drive (Docs) you can upload files from any device so you can access them anywhere.


You can also create Google files right within Drive. 


Below is a list of the various types of files you can create within Drive:
Document - similar to Word Documents
Presentation (also called Google Slides) - similar to PowerPoint
Spreadsheet - (similar to Excel but also does amazing things with Forms)
Form - I don't know what it's similar to, I just love it!
Drawing - a drawing app, of course

Next up - sharing Google files and folders.

Sunday, June 23, 2013

Sharing Technology

Summers off! People think teachers have it made to have summers off. The reality is that we never really leave it. As I look over the plans for summer I'm excited to have some time to finish some projects at home, but one of the biggest projects is to set up some tips for others to add technology into their class activities.

I'll start with how to access Google Drive and try to share some tips for using and introducing the different parts of drive for the classroom.

To give you some background, we were able to access Google Apps for Education around February this year. Each of our students has access to a personal google account though a district site. This allows them to collaborate safely within the network of the district. They also can easily access their files at home or from whichever computer in school they are working on. I love the ability to add files to a class shared folder for us all to work on.