Showing posts with label Tech Tips. Show all posts

Thursday, January 4, 2018

Embed Code Now Available in Google Sites

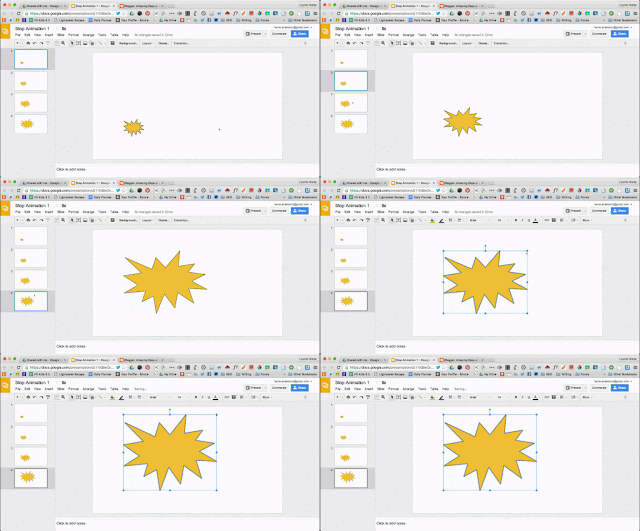
Google just rolled out the ability to embed code into the new Google Sites. The first thing I thought of was that this will be great to share Stop Animation projects using Google Slides.

See my previous post about creating Stop Animation - Google Slides to Stop Animation.
Take the published embed code and add it to a Google Site.


Find the timing for the slides in the code - delayms=1000 and change it to a faster transition. I usually start by trying at least 200ms. That would be 5 slides per second. (MS is milliseconds. 1000ms equals 1 slide per second. The default is usually 3000ms - 3 seconds per slide.)


Sunday, May 28, 2017

Managing All Those Lists!


Do you ever find yourself drowning in lists? Where did I put the class list? The field trip list? Who returned school photo orders? Who got student of the month so far?

The answer of couse, is a spreadsheet. That may seem like a no-brainer, which is why I haven't blogged about it, but I have a few tips that have worked for me and may work for you.

  1. Use the same spreadsheet for all the lists. Just make a new sheet within the file when you need a new list. That way you always know where to find it.
  2. When you need a new check off list, just duplicate the original sheet. Then you have all the kids names, You never have to type a list again.
  3. Bookmark that spreadsheet right at the top of your screen. It will always be handy.
  4. Add student names when you first set it up with first and last in separate columns so you can sort either whenever necessary. 
  5. Advanced tip - use conditional formatting to help you visualize info.


Here's a sample file with some ideas to get you started. Link Here 

Wednesday, August 10, 2016

Collaboration: Sharing Google Forms


Teachers are so amazing about sharing! It goes under the category of "why recreate the wheel?" most of the time. I share with you, you share with me, our lives just got easier and both teachers and students win!

This is why having a wonderful PLN that includes teachers on Twitter that I've never met has been so amazing! Recently, I was reading a blog post from Ms. Drasby (Google Forms Supports Spelling Mastery) where she shared a copy of her Google Form. I had tried to find a way to do that for over a year with no luck. 


I replied and asked about it and she wrote up the procedure in a blog post: Google Forms Force a Copy. It's super easy and simple but if you don't know the trick, it won't work like it didn't for me for so long! It's definitely worth the few minutes to check out her blog and learn the trick!
Google Forms Force a Copy

Now, I am so excited about being able to make forms as a grade level team and share the workload. We can share forms resources just like we do with Hyperdocs, Graphic Organizers, and everything else we do as teachers.

Here are a few of my favorites to get you started: When you click on the form link it will force you to "Make a Copy" of the form I created. So you will have your own, not shared with anyone, and your data will be yours alone. Since it's your copy, you can change it however you would like to make it work for you.

Parent Info Form (Click this link for the Form):
I post this on my website at the beginning of the year and usually get most of the info before school even starts on Monday morning. 

Parent Information 2016.png


Favorite Genre of Books (Click this link for the Form):


<<This one is a good beginning of the year inventory of your students' reading interests.


Here is a spreadsheet of forms my 3rd grade students created to practice multiplication facts. When you click the link, it will copy the form into your drive. There is the tutorial to use Flubaroo to make them autograde. OR, you can turn them into Google Form Quizzes. You will just have to change the answers to multiple choice answers to use Google Forms quizzes at this time.

Multiplication Practice Forms (Click this link)


And here are several other Google Forms to share. 
Click to copy forms and make them your own. Follow the directions above from Ms. Drasby and share your forms too!
Google Forms (Click this link)

Wednesday, March 2, 2016

Flubaroo for Autograding


Autograding?! Can it be? Yes, it can!


(Screencast created for staff at my site.)

Create a Google form as an assessment or assignment. Go to the live form and enter the correct answers yourself. I put Answer Key in the name section to help me identify this set of answers.


Go to Responses. Create a Spreadsheet.

Copy of 4s Facts   Google Forms 2.png


Copy of 4s Facts  Responses    Google Sheets 5.png


You can see the answers I already entered in the image above.
Now go to Add-Ons and Get Add-ons. Search for and add Flubaroo.


Enable Flubaroo as below.
Copy of 4s Facts  Responses    Google Sheets 6.png


Then go back and click on it again to start the Flubaroo. Go to advanced to enable autograde.


Copy of 4s Facts  Responses    Google Sheets 7.png
It will take you through several steps to choose how to grade each part. You can skip grading some pieces. If you need to hand grade an item, you can still use Flubaroo, but can’t autograde.

Copy of 4s Facts  Responses    Google Sheets 8.png


Choose your Answer Key row with the correct answers from when you took the quiz first.
Copy of 4s Facts  Responses    Google Sheets 9.png


Decide on whether or not you want the answer key sent with the scores.

Copy of 4s Facts  Responses    Google Sheets 10.png
And that’s it. All submissions will be graded and scores will be collected in the spreadsheet and students will get results in their email.


Answers will be collected on the first sheet.
4s Facts  Responses    Google Sheets 12.png


Grades will be created on the second sheet with some highlighting for error analysis. 

4s Facts  Responses    Google Sheets 14.png

Time saved on the things that can be assessed easily so you have more time to teach.

Monday, January 18, 2016

Form to Formative Assessment


Documenting student progress doesn't always need to be another piece of paper. When students are actively working, you can observe and use a google form to track mastery. This idea came from Shawn Reed @swkreed and @ClassTechTips on Twitter.

Google Form Example


Create the form and add it to the home screen of your phone or ipad for quick access. I used the Grid option to add levels of mastery. For this sample I used sample student names as numbers but I would use actual names on my form. Here's a link to the live form.


When you view the spreadsheet, you can use the Transpose function and conditional formatting to organize the info and visualize it better.


To use the transpose function, add a new sheet by clicking the + in the bottom left corner. In cell A1, add the function =TRANSPOSE('Form Responses 1'!B:T)
'Form Responses 1' refers to the first sheet where the data is coming from.
B:T is having it pull from all rows in columns B through T

Conditional Formatting:
Highlight the columns, under the Format menu choose Conditional Formatting. On the right side under Format rules, choose Text contains or Text is exactly and then type whatever your text option is. In my example I used Mastery and chose it to be blue, Working toward mastery as green, and Needs extra help as yellow. Each color is set up as a new rule.

Give it a try and see if it helps streamline your formative assessment.


Wednesday, December 30, 2015

Class Dojo Winter Break Challenge


Here's a fun, optional way to keep the kids engaged over breaks. Post a quick challenge question every few days on Class Dojo through Class Story. I am using a google form to make it very quick and easy to see who is participating and award "Challenge Accepted" points.


I used Google Drawing to make an image with the question to use as the photo. Images will get more attention and quickly show the question. You can download the drawing as a png or jpg file to use as the photo and as the header for your form if you'd like. I used the frame and images from Creative Clips on TPT but anything will do.


I'm keeping each challenge to one question to keep it simple. Here is a copy of my Google Form if you'd like to make something similar. https://goo.gl/HLdlUd

It might also be fun to keep the challenges going when break is over. Think about having the students submit challenge questions for the class. They would love to see their challenge be sent out over Class Story!


Sunday, December 20, 2015

Creating Digital Word Sorts


Some tips to creating a word sort using google slides:

Decide on your category headers and lay them out at the top. Set up your background. Once you’ve got it the way you want it, download as an image - I usually use png, but jpg would work too. Then go to ‘change background’ and add that image as a background.
This makes it so a student can’t accidentally change the headers or categories.


Make the word cards by using shapes and typing inside the shape. If you want them to be in a neat stack, select them all (you can select everything by holding the left mouse button and dragging over everything you want selected). Go to Arrange, then arrange vertically, then arrange horizontally. They will be in one neat stack that you can place wherever you want.


You could also make the word cards so those can’t be altered by creating them like you did the background and downloading them as an image, and then uploading them to the slides file. It depends on how important this is to your class and how much time you want to put into it.

Here is an example of a completed word sort that we used last week. The link will prompt you to make a copy.
Word Sort - Adding -ed and -ing

Image of word sort linked above


Saturday, December 19, 2015

Google Slides to Stop Animation


  • You can use Google Slides to create stop animation. 
  • Open a slides file
  • Create a beginning slide
  • Duplicate and change it slightly to tell your story
  • Do this many more times

  • When finished, choose File, Publish to the Web
    • you will set the file to auto-advance every second
    • set to start as soon as the player loads
    • choose restart the slideshow if you want it to loop

  • Press Publish and copy the code
  • Open a new tab and enter the url in the address bar
  • You will see in the url a portion that says delayms=1000, this means that that each slide shows for 1000 milliseconds or 1 second. You want it to move faster for the animation. So before you hit enter, change this number to something smaller. Half a second would be 500 milliseconds. We used 200 for most of our stop animation.
  • Press enter and check
  • Adjust as needed
  • You may need to make more copies of images where you want that image to be on the screen a little longer.

Once you get it the way you want it, copy the link again from the Publish to web, add it to a new tab, change the timing to what you feel is right, then copy that address to use where you want it to go.


Once you get it the way you want it, you can take the url and create a QR code. This makes a fun way for families to access the stop animation projects that students create. 

We used the QR codes in ornaments as a holiday gift for families. 
  
  
Interesting to Note: When we were adjusting the timing of the slides, the 3rd grade students seemed to easily make sense of how 1000ms is 1 second, so if they want the slides to go faster then 500ms would be half a second. When I asked how fast 200ms would be they worked it out quickly that it would be 5 slides a second.
Happy Happy Teacher!
Maybe this will lay some foundation into how fractions work.


Sunday, July 19, 2015

Managing Data from Reading Log Google Forms


Previously, I've blogged about using Google Forms for Reading Logs and Responses. Click here Fun with Forms or here Google Form Fun to check out those earlier posts. I've been using Google Forms for Reading Response for a couple years now. There are several great benefits to doing this: 1) no paper copies, 2) all of the responses are in one place, and 3) did I say no paper copies?

Here are a couple images of reading logs we've used in the last year.


When you use Google Forms, all of the responses are collected in a spreadsheet. This makes it easy to check the responses. You can sort them based on name, date, title of book or more. Here is an image of one of the spreadsheets (names are removed.)


When you change the form depending on the response focus and reading standard you end up with several spreadsheets of info.

So instead of having the answers go to a new spreadsheet each time, change the response destination so they go to a New Sheet in an Existing Spreadsheet. This way you'll have one master spreadsheet with all of the data. Each form will have it's own page in the spreadsheet.

Check out the screencast for details:


Saturday, July 4, 2015

Awesome KeyTips

We already do so much as teachers, it's great when something can make things go even just a little bit faster and easier. Alice Keeler (AliceKeeler.com and @AliceKeeler on Twitter) shares many great KeyTips to make things go smoother.

Here are my top 2 for now:
  1. Control N (or Command N on a Mac) to open a new window and, if you need that window to be in incognito mode, try Control Shift N (or Command Shift N on a Mac). Why would you need an incognito window? I use it all the time when I need to log in to my account on someone else's device or in the workroom and I don't want to have to sign them out. The best place I use it is when I am demonstrating something from a student account side of things. Then I can just go back and forth between my teacher account and the student view.

  2. Control Shift T (or Command Shift T on a Mac) This one is magic! How many times do you close a tab and realize "Oh darn, I need one more thing there and I have to go find that page again!" Control Shift T reopens that tab! Magic right?!
I've decided to put 2 to 3 tips on a post it next to my computer till I remember to use them. Then I'll switch them for 2-3 more. Kind of like high frequency words for our kids. If you want to join me, write these down. If you want to see a bunch and pick the ones you like, go to  http://www.alicekeeler.com/teachertech/tag/keytips/


Wednesday, April 8, 2015

Jon Corippo and Iron Chef!


I didn't go to CUE and I am sad about that. But, it's awesome that I can follow the amazing presenters and learn from their resources. This past weekend, I watched Jon Corippo's presentation on Advanced Search Tricks.  So many great ideas but one stood out and I gave it a try today.
Iron Chef. Jon describes it as students creating instead of listening, and lots of reps and teachable moments. Details from Jon here.
So I decided to try this with my second grade class as we are learning about geometry and plane figures. I created a template google slides file with the parts I wanted them to include.


Kids broke up into 5 groups of 5. One of the team members made a copy of the file and shared with the other team members and me. Each team member was responsible for one slide. They had 20 minutes to add the info to their slide. At the end of 20 minutes, we took our recess. Then each group shared and each member had 30 seconds to share the info on their slide.

The excitement and focus was over the top. Every student was working. As they shared, the whole class got to review the characteristics and attributes of each plane figure 5 times. They caught any discrepancies in facts immediately and helped each other.

Jon suggested having three student judges for the presentations. I also had every student comment on a Google form about something the group did well. All of the students were focused as they wanted me to pick them next to be a judge.


Thank you @jcorippo for sharing such great ideas!
For more info, go to https://sites.google.com/site/mistercorippo/
https://youtu.be/ryDiViQBLOQ

Sunday, February 15, 2015

Nearpod Live or as Homework


I haven't blogged about this yet, but I love Nearpod! I think of it as kind of an 'in yo face' slide show but it's more than that. First, for a live presentation all screens show the same material and progress at the same pace. You control what students see and interact with and it's all on their own laptops or tablets. More than that, there are so many interactive elements. Students can answer polls, draw or write what they are thinking, do a quick quiz to check comprehension, check out embedded sound or web links and more!

Nearpod Info

My class loves when I pull their work to the main classroom screen and they get to discuss and check how that person did. No names are shown on the screen but about 99% of the time, my kids will say "That's mine!" The quick quizzes give each student immediate feedback on their own screen so they can see how they are doing.

It's very simple to create a Nearpod. You can use an already created file in the Nearpod library. You can create one from scratch, you can upload a powerpoint or pdf to use. There is even a Google extension called Nearpodize This that let's you take a Google Slides file directly to Nearpod. Once you load the slide show up you'll want to add interactive activities. That's where it gets fun for the kids. Can we say active participation?!

With a subscription, you can use Nearpods as homework activities. This is using the Nearpod file self paced, but all answers and interactive parts are saved in reports. The homework Nearpod could also be used as a center activity, or review. I have used it with audio files to have the kids do a self paced spelling quiz.

Give Nearpod a try!


Wednesday, January 28, 2015

Google Form Fun


What's there not to love about Google Forms? There are countless ways to use them. This week we are being Word Detectives. Students are finding new or interesting words and predicting the meaning before looking up the word in an online dictionary.
Here's an image of the form they are using for their words


You can check out a copy of the live form here. Word Detective Google Form  (Cleaned up my drive and this form is gone - out of date).

From the linked spreadsheet, I grabbed the list of words the kids have submitted so far and created a Wordle out of the list. 


Another variation is to intro a topic with images and video clips. As they viewed the images and clips, I had the kids submit words that they thought of into a form. Again I pulled their responses into a word art with Wordle. Looking at the word art helped us think about what we know and come up with questions that we would like to research.


Here are some of the questions that they have come up with so far:

  • Are these lava rocks?
  • why do they erupt. why do they make land?
  • Was that the island that was created in the Pacific ocean? How many rocks were there?
  • how does it explode?
  • how does it blow up bursting in the air when it erupts?
  • how do the people who take pictures not die?
Please comment with a way you have used Google Forms with your class.

Sunday, January 18, 2015

Using Class Dojo to Encourage Students to Go Beyond!


I've been a fan of Class Dojo since almost the very beginning. I think the program was released in August, 2011 and my friend and teaching buddy, Marla, got me started in November of that year. Since then, my students have enjoyed seeing their little monsters every day. Some years we have changed them to our own characters like princesses, pirates, and jungle animals. Other years we just see which are assigned randomly.

We've grown along with Dojo, by adding behaviors that are important to us and bringing this little window into our day to the parents through the parent sign up. Our class focuses mostly on the positives - I think this year we've issued one negative. It's nice to work on what we are doing right and try to make that happen more often.

One new behavior we've added this year is Challenge Accepted. When we have something beyond our daily lesson that would be interesting to research, learn, or do - then students can earn Challenge Accepted Class Dojo points. We have several levels of points based on what we think the challenge may be worth.

Over winter break, I asked students to write about their break activities to add to My Maps (something new I learned over break from Molly Schroeder). Their writing needed to be in complete sentences, checking punctuation and capitalization. As an optional task to keep them writing on their break, they earned +3 Challenge Accepted points.

Whenever we come across an interesting question, like "What does am or pm stand for?" Students who take the opportunity to look it up and report back earn a Challenge Accepted point.

A student decided to practice addition and subtraction 2 and 3 digit problems over break without being asked. She was so excited to show me. She didn't even think to ask about Challenge Accepted points but definitely deserved the points!

To encourage kids to try new genre in their independent reading, we currently have a Reading Bingo Challenge. When they read titles from different genre across the bingo row and pass AR tests on the books they earn a whopping +15 Challenge Accepted points!

Check out more about Class Dojo and their new app in this article by Richard Byrne.
ClassDojo Releases a Streamlined New App - Now You Can Send Pictures Too

Give it a try! Challenge Accepted!

Sunday, January 4, 2015

Expert Help: Alice Keeler on Google Sheets: Creating a Line Graph


My class has done the Journey North Mystery Class Project for several years. It's a year long project that takes us through tracking daylight and observing changes to using geographical clues. We will be looking for 10 Mystery Classes located somewhere around the world.
So far, we've always graphed the data on paper and posted them in the classroom. We will still work on that, but I wanted a way the kids could see the data online so they could refer back to it, talk about what it means, and make predictions. I was stuck because I couldn't get the data into a line graph in Google Sheets or Excel.
One morning I posted the question to Alice Keeler (@AliceKeeler).

 Twitter Question
She asked a few more questions, I shared the Google Sheet file with her, and was able to watch as she moved things around and made it work! The amazing thing about Google Sheets, or any Google Doc, is the ability to share in real time! She commented right in the file and showed me where I went wrong and how to fix it. Not only do I have a line graph that I had been trying to figure out for several years, but I know how to do it myself the next time!

Click here for the explanation in Alice Keeler's blog. AliceKeeler.com

http://www.alicekeeler.com/teachertech/2015/01/04/google-sheets-creating-a-line-graph/

Alice Keeler's Blog

Thursday, January 1, 2015

Fun with My Maps


Recently I came across a link from Twitter to a you tube video from Teach Tech Play. They do a monthly teacher web share of lessons, tips, and ideas. This was December's episode and Molly Schroeder shared a great tip for using Google's My Maps with Google forms to share geographical data. You see Molly's part of the episode here. Teach Tech Play Episode 6.


Start at 30:15 to watch Molly's segment.
Basically, what you do is set up a Google form to collect data that includes location info. The collected info is gathered in a Google spreadsheet. Open My Maps (or just Google it). Follow Molly's instructions and demo on how to import the data.


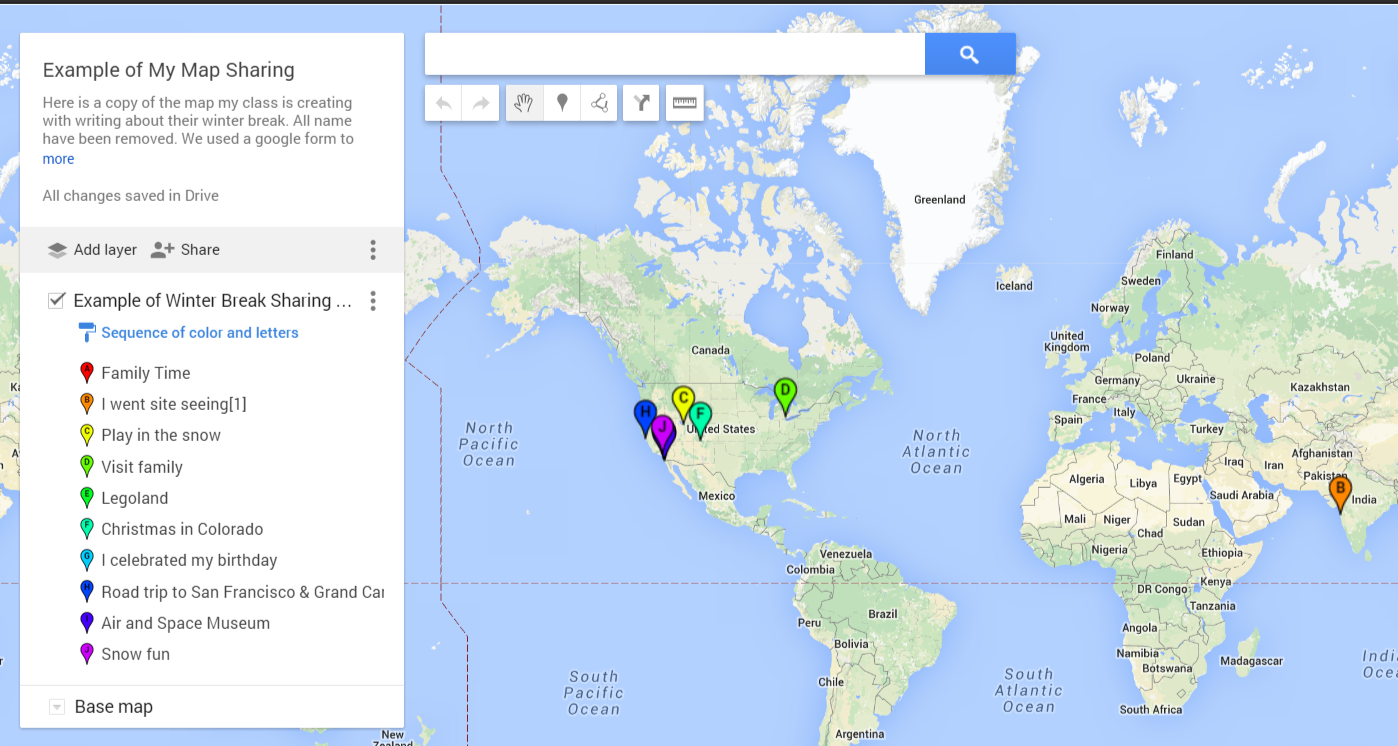
Here is an example of my students sharing info from their winter break (names have been removed.) Example of Winter Break sharing map (<Link to live map example).

Example of My Maps


I also have plans use Molly's suggestion to collect weather and climate data from family and friends of the students to compare data from all over. I'm sure there are many many uses for this tool. Comment with your ideas, I'd love to hear them!

Thank you, Molly, for the great idea and explanation!
https://twitter.com/followmolly
https://sites.google.com/site/mydigitalfootprint/